 |
Putting it Back Together:
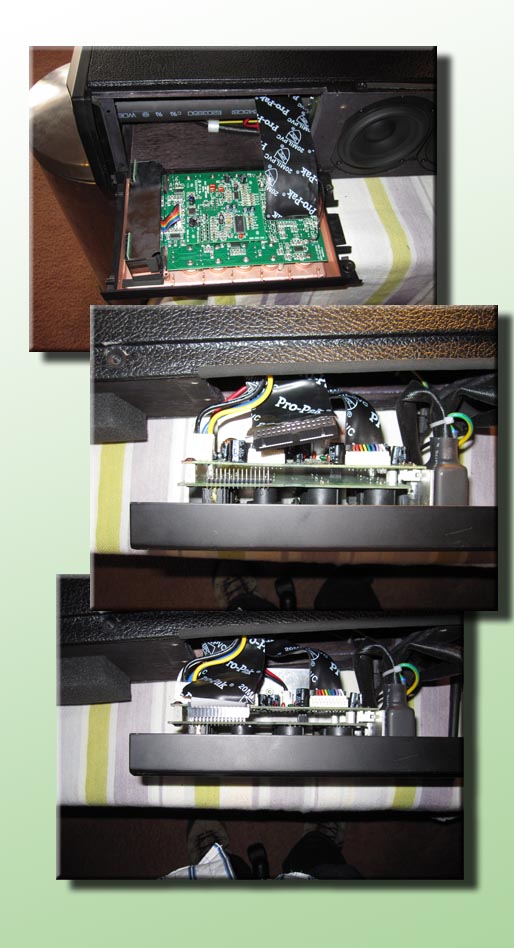
Now it's time to put everything back together and see how it sounds. Start by installing the front panel. Route the cables around the post and out the back of the amplifier case then install the two screws that hold the front panel in place. You can also install the two screws that go in from the bottom.
Install the rear panel next by first plugging in all the cables that were unplugged during the repair process. Most are keyed, but it is possible to plug the grey ribbon cable in backwards or offset by one or more rows if you try hard enough, so take your time. Take care to route them such that when you screw down the rear panel nothing is pinched. I had some problems with one of the ribbon cables getting pinched between the center post and the circuit board causing a capacitor to press against a surface mount resistor and breaking it (see below), so it pays to be careful at this point. Once the rear panel seems to fit into place without having to press too hard go ahead and install the four screws that hold it in place.
All that's left now is the front and rear covers and the handle. I had to loosen the top cover a bit to get the panels to fit into place. Your mileage may vary on that. Install the 12 screws that hold the panels in place as well as the two holding the handle. That's all there is to it. Now we can power it up and see how it sounds.
.
.
.
|
|
Results:
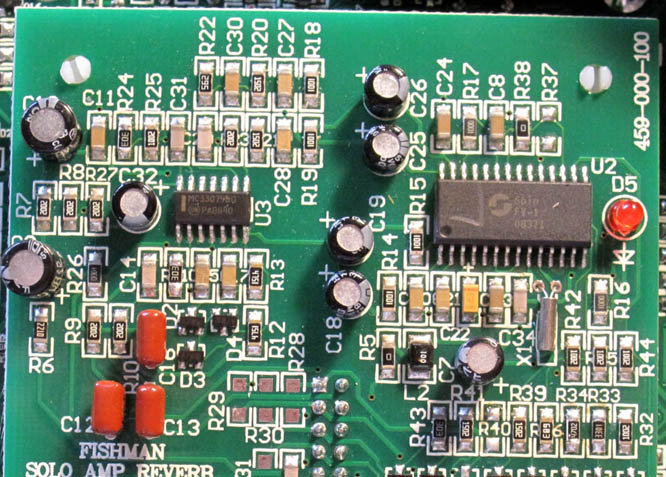
After performing this mod, my Solo amp was so much quieter. The buzzing was completely eliminated even with the master volume and pre amp turned all the way up. There is a noticeable hiss if your close to the amp and have the volume at max, but it's a pretty low level plus I can never crank my volume up that high when I have a real source playing through the amp. While I was working on the amp I was also taking notes on the circuitry. Fishman used allot of MC33079 quad op amps from On Semiconductor. Although these aren't bad, it is possible to get the drop in replacement AD8674 from Analog Devices that has almost half the noise. Maybe a nice project for a rainy day.
Another thing I noticed was the use of a single chip reverb chip my Spin Semiconductor called an FV-1. The data sheet is available from their web sight and it appears the chip has more capability than what is being used in the Solo Amp. Perhaps another opportunity for some hacking mayhem???
|
 |
 |
Uh Oh, More to the story......
Well, after using the amp lightly for a week or two I began to notice an occasional dropout in the volume, particularly when the amp was first powered up. I guess I was due since things had gone so smoothly up to this point. Back on the bench goes the amp.
After taking the amp apart again I hooked up my IPOD to the auxiliary input and began carefully probing the signal path with my scope while also pressing on the board and various components. Eventually I found when I pressed down on a capacitor that was folded over on the board I could get the sound to come and go. I lifted up the capacitor and saw a surface mount chip resistor underneath that was cracked. After looking things over a bit I realized that I had routed the ribbon cable poorly when I put it back together after shieding it and that the cable pressed down firmly against the capacitor which in turn pressed against the chip resistor causing it to crack. The clue I missed when I put it back together was that the rear panel didn't fit very well and I had to tighten the screws to get it to sit flat against the enclosure.
No problem. find out the value of the resistor and replace it. First let me press on it one more time just to confirm it's the cause of the problem. Press-> sound goes away, Release -> Sound comes back, Press again-> SNAP..SIZZLE...FLASH, Oh crap, what was that!! I quickly turn the power off and began looking at the Class D amplifier board where I just witnessed all the carnage out of the corner of my eye. I don't see any obviouse problems, no black parts, no smell of burn components. Lets see what happens if I turn the power back on. Don't do it you say.. where were you when all this happened -> SNAP...SIZZLE..FLASH.
.
|
|
Fixing that thing I broke while I was fixing that other thing...
.
Details of repair to follow. The amplifier has been working great for several weeks now. Don't hesitate to make the mods to eliminate the buzz if your having a problem. The mods had nothing to do with my subsequent problems other than I wasn't carefull when re-assembling the amplifier. Now that it's all over, I couldn't be more happy with the Solo Amp.
|
|